help
Tips & tricks
Tips & Tricks
→ Using URL parameters to affect embedded content
→ Full-page iframe embedding
→ Full-page images links / background images
→ Centring content on a page
→ Redirect for non javascript browsers
→ Using selectors to address particular menu items with CSS
→ Meta tags - adding site descriptions, favicons and more
→ CSS Shapes
→ CSS Animation
→ Adding Google Web Fonts
→ Adding Anchor Links
→ Social Network Buttons (like, tweet, +1, follow)
Using URL parameters to affect embedded content
Whether you're embedding content from Vimeo, Youtube, Google Maps or anywhere else on the web, most sites have parameters in their embed URLs (when using an iframe embed) that can affect the way the content is displayed.
For example if I just copy this youtube embed code into a text box:
<iframe id="video"
 width="560" height="315"
 src="http://www.youtube.com/embed/2FwCMnyWZDg"
 frameborder="0" allowfullscreen>
</iframe>
It will look like this:
But if I copy the following:
<iframe id="video"
 width="560" height="315"
 src="http://www.youtube.com/embed/2FwCMnyWZDg
 ?showinfo=0
 &modestbranding=1
 &controls=0
 &iv_load_policy=3"
 frameborder="0" allowfullscreen>
</iframe>
It will look like this (play the videos to better see the difference in appearance):
This is because I added several parameters to the URL of the embedded video to hide the video title, the youtube branding, the controls and the annotations.
The parameters are generally attached to the end of a URL with the initial parameter beginning with a ? and each following parameter being attached with an & so taking the format http://www.site.com/thing?param=1¶mtwo=1 .
It would take a great deal of writing to explain each and every parameter for every site but luckily most have great documentation on what each of theirs are and how to use them.
Below are links to the major ones:
full-page iframe embedding
In order to add a full page iframe to your page simply copy the following into your page specific HTML:
<iframe id="someidyouchoose"
src="http://pageyouwanttoembed.com"
width="100%"
height="100%"
scrolling="yes"
</iframe>
Just set the site you want to embed, give it an ID and decide whether or not you want to allow scrolling. Then add the following CSS in your page specific CSS section to properly position it:
  #someidyouchoose {
  position:absolute;
  top:0px; left:0px;
  overflow-x:hidden;
  }

  body {
  overflow-x:hidden !important;
  }
Make sure you set the id (the word after the #) to the same as you set in your HTML and there you have it. You can see an example of this in action on our Contact Us page.
Also remember that if you just want to place an iframe somewhere on your page you can do it by putting an iframe tag within a text asset.
full-page image links / background images
(Please note that you must have a premium account for this.)
This code will create a background image which scales with the browser window (without distorting) and can be a clickable link.
You can see an example of this in action by clicking here.
Click here for a more in depth guide with alternate methods from CSS-Tricks.com.
Follow the instructions below to get this setup.
First make a new page and call it something like uploads make it published but hide it from the navigation.
We're just going to use this as a place to upload the background image you want to use.
Then on that page upload the image you want to use as your background image.
Once it's uploaded click on it to go into detail view then right click on the image and select 'copy image location' or 'copy image URL'.
Paste that link somewhere like a text file because you'll need it a little later.
then on the page where you want the fullscreen image link go to the code editor in the menu on the right
(it's the one with the < > tab) and go to 'page specific' then 'css'.
Paste the following there:
#backgroundlink {
 position: fixed;
 top:0px;
 left:0px;
 width:100%;
 height:100%;
 background: url(PASTEYOURIMAGEHERE) no-repeat center center fixed;
 -webkit-background-size: cover;
 -moz-background-size: cover;
 -o-background-size: cover;
 background-size: cover;
 filter:
 progid:DXImageTransform.Microsoft.AlphaImageLoader(src='.myBackground.jpg', sizingMethod='scale');
 -ms-filter: "progid:DXImageTransform.Microsoft.AlphaImageLoader(src='myBackground.jpg',sizingMethod='scale')";
}
Once you've done that get the image link you copied earlier and replace the PASTEYOURIMAGEHERE text with the link.
(the link should look something like http://salon.io/system/files/4ff0f3/224374a850ec00000f/original_blah.jpg)
Then go to the 'page specific' 'html' tab and paste the following:
 <a href="PASTEYOURLINKHERE">
 <div id="backgroundlink">
 </div>
 </a>
Then replace the PASTEYOURLINKHERE text with the link you want it to go to.
And that's it now you should have a full page image in the background that scales with the browser windows (without distorting) and links to wherever you want.
Note that if you do not want it to link anywhere simply remove the and tags from the custom HTML.
Also if you want to apply this across your entire site simply place the code in the global code editor sections rather than page specific.
Centering content on a page
(Please note that you must have a premium account for this.)
In order to do this we’ll centre the content element (which contains everything on the page) using auto-margins either side. To do this simply copy the following into the CSS section of the code editor:
#content {
width:1000px;
margin:0 auto !important;
padding-left:0px;
}
Specify a width for your centred content and you're good to go - this can either be in pixels or as a percentage of the width of the browser window.
Redirect for non javascript browsers
Only for premium accounts.
You can add a noscript tag to the header by pasting the code into the meta tags field.
<noscript>
Your browser does not support JavaScript! <br/>
You will be redirected to <a href="http://redirect.com">redirect.com</a>
<meta http-equiv="Refresh" content="2; url=http://redirect.com" />
</noscript>
Using selectors to address particular menu items with CSS
(Please note that you must have a premium account for this.)
You can affect specific menu items using css selectors. This allows you to style particular items differently to others. For example in our menu on this page we have styled 'Getting Started' and 'Advanced Help' differently so that they appear as non-clickable headers.
To learn more about how to address using selectors see:
w3schools's Reference
Lea Verou's Demo
CSS-Tricks's Demo
CSS-Tricks's Guide
On this page we use the following CSS:
a[href="/help/getting-started"] ,
a[href="/help/advanced-help"] {
   color: #999 !important;
   pointer-events:none;
}

a[href="/help/div1"] ,
a[href="/help/div2"] {
  color: #ff7129 !important;
  pointer-events:none;
}
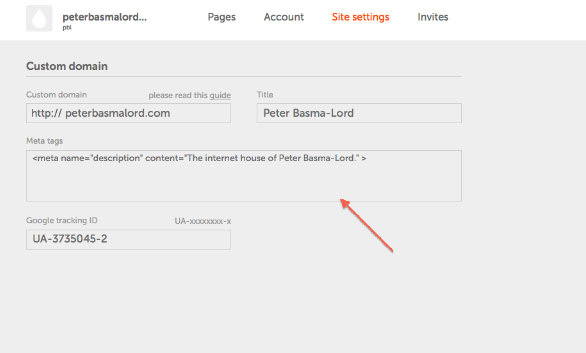
Using meta tags you can add a lot of information to your Salon.io site easily but please note that this only works when you have a custom domain setup. To access your meta-tags / header information simply go to site settings as you can see in the screenshot below:

Here you can enter tags to inform browsers and search engines about your site. For example a short descriptive tag can help with indexing your site on Google and also display as a description for you site in Google's search results.
<meta name="description" content="your description goes here" >
For much more in-depth help check out this great guide:
quotes.uk.com's guide to meta-tags.
To add a custom favicon first upload the image you want to use (make sure it is a 16px x 16px GIF) on one of your Salon.io pages (you can just make a new one called something like assets - make sure it's set to published but not visible in your menu.) Then copy the image location ( it should look something like:
http://salon.io/system/files/509273/c04374a858b900009d/original_favicon.gif
Then add the following code to your custom meta-tags section in your site settings:
<link rel="icon" type="image/gif" href="http://salon.io/system /files/509273/c04374a858b900009d/original_favicon.gif" />
<link rel="shortcut icon" type="image/gif" href="http://salon.io/system/files/509273/c04374a858b900009d/original_favicon.gif" />
But replace the image links with the one you copied previously. Please note that this only works when people access your page via your custom domain!
You can also host your favicon anywhere on the web - just use the image's URL in place of one hosted on Salon.io
We're working to add simple uploading and native support for .ico files.
CSS Shapes
Using CSS styles it's possible to make relatively complex shapes
without the need for actual image files. For example the following
style applied to a div will make a red square:
#square { width: 100px; height: 100px; background: red; }
That's pretty basic but this scales up to things like hearts:
To learn how to make the heart as well as many other CSS shapes
check out the following guide from CSS Tricks:
CSS Tricks - The Shapes of CSS.
CSS3 Animation
Using keyframes and animation rules it's possible to produce incredibly complex animations purely using CSS. For example you can create a rainbow background effect (see the square below!) using the following CSS:
#rainbow {

background:red;
animation:rainbow 10s;
-moz-animation:rainbow 10s; /* Firefox */
-webkit-animation:rainbow 10s; /* Safari and Chrome */
animation-iteration-count:infinite;
-moz-animation-iteration-count:infinite; /* Firefox */
-webkit-animation-iteration-count:infinite; /*Safari and Chrome*/
}

@keyframes rainbow
{
0% {background:#F7D0E0;}
33% {background:#D0F7F3;}
66% {background:#D8F7D0;}
100% {background:#F7D0E0;}
}

@-moz-keyframes rainbow /* Firefox */
{
0% {background:#F7D0E0;}
33% {background:#D0F7F3;}
66% {background:#D8F7D0;}
100% {background:#F7D0E0;}
}

@-webkit-keyframes rainbow /* Safari and Chrome */
{
0% {background:#F7D0E0;}
33% {background:#D0F7F3;}
66% {background:#D8F7D0;}
100% {background:#F7D0E0;}
}
The three sections are to allow for cross-browser compatability but to change the effect simply alter the percentages to change timing and the colours to change, well, the colours! You can of course add more lines or remove lines, this is a great example to show the basic principles behind CSS animation.
To learn more about the wealth of possibilities when animating with CSS check out the following guides:
Adding Google Web Fonts
(Please note that you must have a premium account for this.)
To use other fonts from Google Web Fonts simply go to their site:
http://www.google.com/webfonts
find the font you want, then click quick-use.
On the next page copy the text which reads 'add this code to your site' then go to your account settings page. Paste the text into the box called 'Meta tags'.
Then go back to the google web fonts page and copy the text under 'intergrate the fonts into your CSS'. Paste this text into your custom CSS on Salon.io and apply it to whichever elements you want.
For example:
body {
font-family: 'Roboto Condensed', sans-serif;
}
Will apply the font to your whole page.
Anchor Links
Anchor links are used to allow you to direct a user to another section of the current page. The links at the top of this help page are anchor links.
To add one to your page first add a text-box at the point on your page you want to link to (unless you already have one there).
Then add the link as follows into the code editor for that text box (click the <> symbol whilst editing the text box to access the code!):
<a id="yourlinkname"></a>
Replacing 'yourlinkname' with... you get the idea.
Then you can link to that point from anywhere else by adding a link in the text which simply links to #yourlinkname
You'll then be left with a link which takes you to the point on the page where you placed the anchor earlier.
To see this working just click the links at the top of this page!
Social Network Buttons
Below are links to various social networks' pages on how to add 'like', 'tweet' or similar buttons to your pages. We'll be adding more in-depth guides on this specifically for Salon.io in the next few days.
Twitter
Note that this requires a premium account as you need access to custom HTML.
To add a button that allows your visitors to tweet about your page just go to this link.
From there first copy the javescript block (see text below) into either your global HTML section if using the button throughout your site or your page specific HTML if only using it on one page:
<script>!function(d,s,id){var js,fjs=d.getElementsByTagName(s)[0];
if(!d.getElementById(id)){js=d.createElement(s);js.id=id;
js.src="https://platform.twitter.com/widgets.js";
fjs.parentNode.insertBefore(js,fjs);}}(document,"script","twitter-wjs");
</script>
Once this is one you then need to copy the link section (see text beow) into a textbox on your site wherever you want the button to appear:
<a href="https://twitter.com/share" class="twitter-share-button"
data-lang="en">Tweet</a>
Once this is done you wil need to refresh the page in order for the Javescript to load (this is something we're working on).
You can see an example of this button above.
If you visit Twitter's button documentation you'll find help and guidance on the many options for customisation of the button's appearance and behavior.
Facebook
To create a button similar to the one above just go to Facebook's Like Button page.
Then fill in the various parameters in the configurator as shown below:
![]()
Then in the dialogue that pops up choose 'iframe' and copy the text provided into a textbox on your Salon.io site.
![]()
You should then have a working 'like' button! You can alter its appearance somewhat using the options in the configurator - for more on this see the page previously linked to. Please also note that in order to use the iframe button you must disable the 'send' option in the configurator.
Tumblr
To add a 'follow' on Tumblr' button to your site just go to Tumblr's button page.
Then select the button you want to use, the blog you want the button to follow and then click 'get the code' as shown in the image below:
![]()
Then just copy the code provided into a textbox on your Salon.io site.
This will provide you with a button similar to the one above.
Google Plus
To add a '+1' button to your site go to Google's +1 button page.
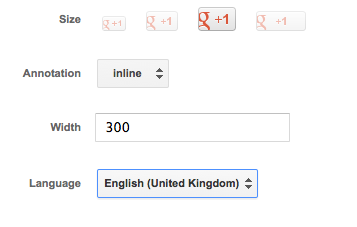
Then configure the button to your liking as in the image below:

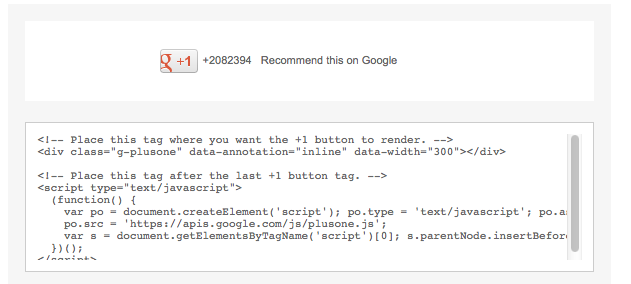
Then just copy the code on the right into a textbox on your Salon.io site wherever you want the button to appear:

You should then have a button similar to the one above.
JavaScript is turned off.
Please enable JavaScript to view this site properly.